전체프로세스 배포 전 디버깅모드로 보는 전체 프로세스
< 전체 프로세스 >
1. 안드로이드에서 이미지를 받는다.
2. 받은 이미지를 Request로 받아 전처리 작업
3. Tf serving에 있는 seglink 모델로 이미지를 보낸다.
4. 모델에서 나온 결과를 디코딩
5. Tf serving에 있는 CRNN 모델로 이미지를 보낸다.
6. 결과로 나온 텍스트를 확인한다.
안드로이드(이미지) > 서버 > TF-serving(seglink) > TF-serving(CRNN) > 결과 (텍스트)
< 디버깅 모드로 확인 >
# 필요한 라이브러리 로딩
from django.shortcuts import render
from django.views.decorators.csrf import csrf_exempt
from django.shortcuts import HttpResponse

import argparse
import json
import numpy as np
import requests
import cv2

from PIL import Image
from PIL.ExifTags import TAGS
from keras.preprocessing import image

from io import BytesIO
import matplotlib.pyplot as plt

import sys
import os
# 쥬피터에서 한글폰트 설정
%matplotlib inline
import matplotlib as mpl
import matplotlib.pyplot as plt
import matplotlib.font_manager as fm

#plt.rcParamas['axes.labelsize'] = 18
#plt.rcParams['xtick.labelsize'] = 16
#plt.rcParams['ytick.labelsize'] = 16

#matplotlib 한글 폰트 설정

path = '/usr/share/fonts/truetype/nanum/NanumGothicEco.ttf'
font_name = fm.FontProperties(fname=path, size=16).get_name()
print(font_name)
plt.rc('font', family=font_name)
mpl.rcParams['axes.unicode_minus'] = False
fm._rebuild()
- 한글 폰트로 설정을 해줘야 쥬피터에서 한글 깨짐현상없이 볼 수있다.
# 안드로이드를 통해 저장 된 이미지 확인
img = cv2.imread('./../test.jpg')
img.shape
- 현재는 안드로이드로 사진을 촬영하면 test.jpg로 자동 저장되게 설정 되어있다.
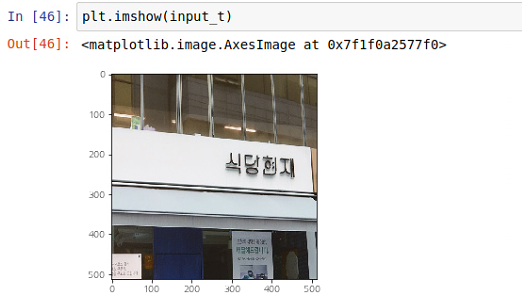
# 이미지 전처리
input_seglink = cv2.resize(img, (512,512), cv2.INTER_AREA)
input_t = input_seglink.astype('int32')
plt.imshow(input_t)
- seglink 모델에 이미지를 넣기 위해서는 512,512 형태로 resize를 해야한다.
- plt.imshow()를 사용해서 나중에 이미지를 확인해야하는데 이때 타입이 'int32'로 맞춰줘야해서 다른변수에 담아준다.
# 인스턴스 생성
payload_seglink = {
        "instances": [{'input_1:0': input_seglink.tolist()}]
    }
# Seglink 모델에 이미지 보내기
res_seglink = requests.post('http://localhost:9002/v1/models/seglink:predict', json=payload_seglink)- localhost 부분에는 개인서버의 ip주소(그 서버의 tfserving에 모델이 있음)를 적어주면된다
# 결과 디코딩
pred_seglink = json.loads(res_seglink.content.decode('utf-8'))
pred_seglink_np = np.array(pred_seglink['predictions']) # (1, 5461, 31)
pred_seglink_np = np.squeeze(pred_seglink_np, axis=0) # (5461, 31)
- 결과는 json형태로 오기때문에 json.loads()로 읽어준다 : 이때 디코딩은 utf-8
- 가져온 결과에서 predictions부분만 가져온다.
- 그리고 3차원 배열을 2차원 배열로 변경한다.
# 경로 변경 / 라이브러리로딩
sys.path.append(os.path.dirname("../../webserver/abs"))
from tfserving.utils import sl_util, crop_word
from tfserving.utils.crnn_utils import decode
from tfserving.utils.crnn_utils import dict838 as dic
from tfserving.utils.bboxes import rbox_to_polygon
- 사용할 파일들이 있는 곳으로 경로를 재 설정 해준다.
# 결과 디코딩하기
prior_util = sl_util.PriorUtil()
boxes = prior_util.decode(pred_seglink_np, segment_threshold=0.4, link_threshold=0.25, debug=False)
- 위에서 나온 결과는 (5461, 31) 배열의 형태로, 디코딩해서 박스의 좌표값으로 변경해야한다.
# 박스값을 crnn에 들어갈 수 있게 변환
xylist = []
xy_raw = []
for box in range(len(boxes)):
    xy_rec = rbox_to_polygon(boxes[box][:5])
    xy_rec = np.flip(xy_rec, axis = 0)
    xy_raw.append(xy_rec)
    xy_r = [r/512 for r in xy_rec]
    xylist.append(xy_r)

len(xylist)
- boxes값들을 crnn에 넣어주기 위한 단계
- rbox_to_polygon 함수를 사용한 뒤, 결과를 flip시켜줘야한다.
- 그리고 x,y를 512로 나눠 0~1 사이의 값들이 되게 정규화 작업을 한다.
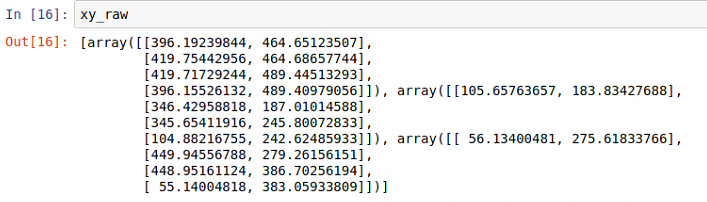
- 추후에 사용 될 정규화 하기 전 좌표 값은 다른 변수에 담아놓는다.
# crop_word
words = crop_word.crop_words(input_seglink, xylist, grayscale=True)

word_images = np.ones([len(words), 256, 32, 1])

for j in range(len(words)):
    word_images[j] = words[j].transpose(1,0,2)
- crop_word를 사용해서 이미지에서 박스 좌표 안쪽에 해당하는 영역만 자른다.
- 동일한 shape을 맞춰주기 위해 (256,32,1)형태의 3차원 배열의 각각의 잘려진 텍스트 이미지를 담는다.
# crnn 모델에 넣고 결과 받기
text_list = []
for input_crnn in word_images:

    payload_crnn = {
        "instances": [{'image_input:0' : input_crnn.tolist()}]
    }

    res_crnn = requests.post('http://localhost:9002/v1/models/crnn:predict', json=payload_crnn)

    pred_crnn = json.loads(res_crnn.content.decode('utf-8'))
    pred_crnn_np = np.array(pred_crnn['predictions']) # (1, 62, 836)
    pred_crnn_np = np.squeeze(pred_crnn_np, axis=0) # (62, 836)

    chars = [dic[c] for c in np.argmax(pred_crnn_np,axis=1)]
    res_str = decode(chars) # final text

    text_list.append(res_str)

print(text_list)
- 단어의 갯수만큼 반복문을 돌면서 모델에 보내 결과를 받는다.
- 각각의 결과를 text_list안에 담는다.
- 결과를 디코딩하는 작업도 함께 진행한다.
# 시각화
plt.figure(figsize=(10,10))
ax = plt.gca()
im = plt.gci()
plt.imshow(input_seglink)
for t in range(len(text_list)):
    ax.add_patch(plt.Polygon(xy_raw[t], fill=False, edgecolor='y', linewidth=1))
    ax.text(xy_raw[t][0][0], xy_raw[t][0][1], text_list[t], bbox={'facecolor':'y', 'alpha':0.5}, rotation=0)

plt.show()
plt.savefig
- 리사이즈한 이미지 위에 seglink모델에서 나온 박스좌표를 그린다.
- 그 위에 text로 crnn모델에서 나온 라벨을 달아준다.
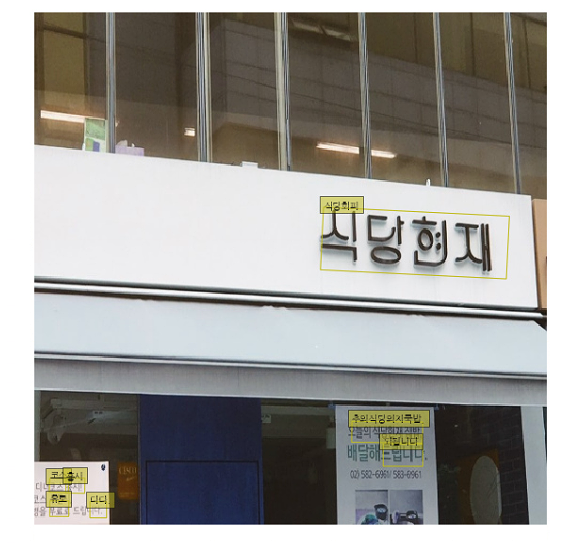
- 현재 간판위치는 잘 잡으나, 아직 한국어 라벨의 부족 문제로 텍스트 인식능력은 떨어지는 상태
- 추가적인 학습이 더 필요함
- 일단 전체 프로세스는 잘 진행이 되었다.
'Project > TakePicture_GetResult' 카테고리의 다른 글
| [Project] DeepLearning 발표자료(OCR, TFserving) (0) | 2019.05.22 |
|---|---|
| [NLP]자연어처리_감정분석 (2) | 2019.05.20 |
| [NLP]자연어처리_키워드추출 (0) | 2019.05.15 |
| [NLP] 자연어처리_예약자리뷰 요약 (0) | 2019.05.13 |
| [Project] 크래커 프로젝트 전체 흐름 (0) | 2019.05.08 |


